A heavy Georgia thunderstorm is raging outside, and then you notice it: a dark, expanding water spot on your ceiling, or the unmistakable sound of dripping water where it should not be. A roof leak is always a serious problem, but when it happens in the middle of an active storm, it becomes a true emergency.
Here is the critical truth: you cannot fix the roof right now, and you should not try. No one — not you, not a professional crew — should be on a roof during a thunderstorm. What you can do is take immediate, strategic action inside your home to minimize the damage and potentially save yourself $1,000–$5,000 in interior repairs.
Every step in this guide happens safely inside your home. The permanent roof repair starts after the storm passes and a professional can arrive — typically within 2–4 hours for reputable companies in North Georgia.
Critical Safety Warning: All of these steps take place inside your home. Do NOT go outside, climb a ladder, or attempt to access the roof during a storm. Lightning, high winds, and wet surfaces make exterior work during a storm potentially fatal. The roof will be there when the storm ends.
Step 1: Contain the Water Immediately
Your first priority is controlling the water that is already entering your home. Every minute of uncontrolled flow spreads the damage further — soaking into drywall, ruining flooring, and reaching belongings that may be irreplaceable.
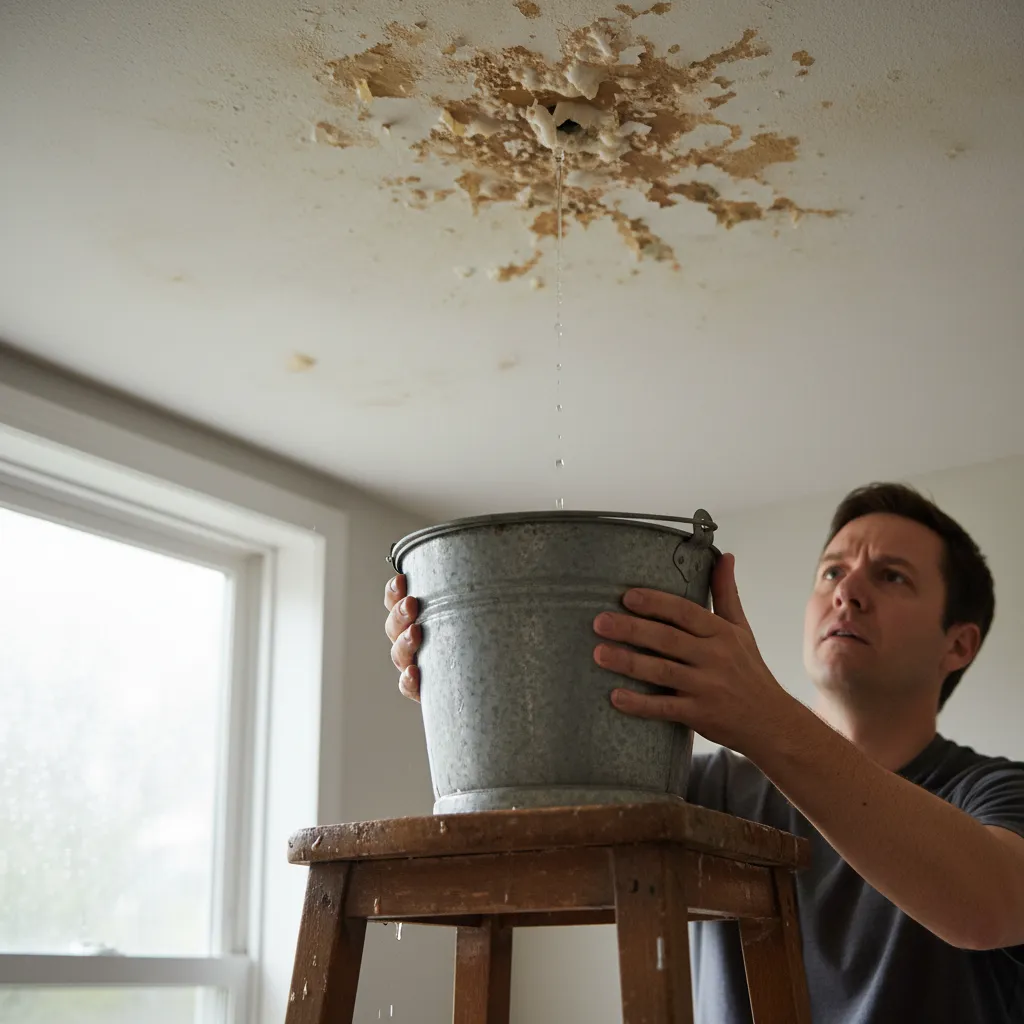
Place containers under every drip point. Buckets, trash cans, large pots, storage bins — anything waterproof. If the drip is splashing and spreading on hard floors, place an old towel or t-shirt inside the container to absorb the impact and eliminate splashing. A single active drip can produce 2–5 gallons of water per hour during a heavy storm, so check your containers regularly and empty them before they overflow.
Spread protection on the floor. Around each drip point, lay old towels, plastic tarps, or even trash bags to protect the flooring in a 3–4 foot radius. Hardwood and laminate flooring are especially vulnerable — even 30 minutes of standing water can cause warping and buckling that costs $500–$1,500 to repair.
Address ceiling bulges immediately. If you see a sagging bulge or bubble forming on your ceiling, this is an urgent situation. Water is pooling on the back of the drywall, and the weight can reach 50–100+ pounds before the entire section collapses in an uncontrolled burst that can damage flooring, furniture, and even injure someone standing below.
Here is how to safely relieve a ceiling bulge:
- Place a large bucket or trash can directly below the lowest point of the bulge
- Spread towels or plastic around the area (this will splash)
- Using a small screwdriver or awl, puncture a single hole at the lowest point of the bulge
- Let the water drain in a controlled stream into the container
- The bulge will flatten as the water drains — this is normal and means the pressure is relieved
This controlled release prevents the catastrophic ceiling collapse that would otherwise occur. Yes, you are putting a hole in your ceiling — but that small hole is infinitely preferable to a 4x6 foot section of drywall crashing to the floor along with gallons of dirty water.
Step 2: Protect Your Valuables and Electronics
Once the active drips are contained, expand your protection zone. Water does not just drip straight down — it wicks through insulation, runs along ceiling joists, and can emerge in unexpected places as the storm continues.
Move these items first (highest priority):
- Electronics — computers, TVs, gaming consoles, routers. Water and electronics are an expensive and potentially dangerous combination. Unplug before moving.
- Important documents — tax records, insurance papers, birth certificates, titles. Store in a waterproof container or plastic bag and move to a dry room.
- Sentimental items — photo albums, artwork, heirlooms. These are often irreplaceable.
For items that cannot be moved:
- Drape heavy plastic sheeting (contractor-grade trash bags work in a pinch) over large furniture
- Elevate items on blocks or books to get them off the floor where water may spread
- Close doors to unaffected rooms to limit the spread zone
Check adjacent rooms. Water inside walls can travel laterally. If the leak is in your living room, check the adjacent bedroom, hallway, and any room that shares a ceiling with the leak area. Look for new stains, bubbling paint, or damp spots that indicate water is spreading through the structure.
Step 3: Do NOT Do These Things
In the stress of the moment, homeowners often make well-intentioned decisions that actually worsen the situation or create new dangers. Here is what to avoid:
Do NOT go on your roof. This bears repeating because it is the most dangerous mistake you can make. A wet roof during a thunderstorm is potentially fatal — lightning, zero-traction surfaces, high winds, and zero visibility combine to create conditions that even professional crews will not work in. No amount of water damage justifies risking your life.
Do NOT try to patch the leak from inside the attic. Pushing rags, caulk, or spray foam into an active leak point from below does not stop the water — it redirects it. The water will find another path, often emerging in a harder-to-reach location. The only effective repair happens on the exterior, after the storm, by a professional.
Do NOT turn off your electricity unless water is near the electrical panel or outlets. If water is dripping near light fixtures, switches, or outlets, turn off the breaker for that circuit (not the whole house, unless necessary). If water is actively flowing near your main electrical panel, leave the house and call your electric utility.
Do NOT assume the leak will stop when the rain stops. After a heavy rain, water continues draining through the roof system for 30–60 minutes. Keep your containers in place and continue monitoring for at least an hour after the rain ends.
Step 4: Document Everything While It Is Happening
Your insurance claim will be significantly stronger if you can show the leak in action. While you are managing the situation, take a few minutes to create a visual record.
What to capture:
- Video of active dripping — even 30 seconds of a smartphone video showing water entering your home is powerful evidence
- Photos of ceiling stains — shoot wide shots showing the affected area in context, plus close-ups of the stain edges and any bulging
- Photos of the floor — show standing water, wet carpet, affected hardwood
- Photos of damaged belongings — anything that has been soaked or stained by the leak
- Timestamp everything — most phone cameras embed date/time metadata automatically
This documentation serves two purposes: it establishes the timeline of events for your insurer, and it demonstrates that you took reasonable steps to mitigate the damage (which your policy requires).
Step 5: Make Your Calls
With the immediate situation stabilized, make two critical phone calls:
Call 1: A roofing contractor. Contact a local, reputable roofing company that provides emergency roof repair services. Even though they cannot come during the storm, getting on their list ensures you are among the first calls when the weather clears. Let them know:
- You have an active leak during the storm
- The approximate location and severity (one drip vs. multiple, ceiling bulge, etc.)
- Whether you need emergency tarping as soon as conditions are safe
Most reputable companies in North Georgia can dispatch an emergency crew within 2–4 hours of the storm clearing. After major, widespread storms, response times may extend to 6–12 hours.
Call 2: Your insurance company. Report the damage and start the claims process. Your insurer will:
- Assign a claim number
- Advise you on their documentation requirements
- Confirm your coverage for emergency repairs and interior damage
- Schedule an adjuster visit (typically 3–7 business days)
Keep a written log. Note the time of each call, who you spoke with, and what they told you. This log becomes part of your claim file and protects you if there are disputes later.
Step 6: After the Storm — Next Steps
Once the rain stops and conditions are safe outside, you enter the recovery phase. Here is the sequence:
Within the first hour after the storm:
- Walk the exterior of your home (on the ground) and photograph any visible damage — missing shingles, debris on the roof, dented gutters
- Check gutters and downspouts for blockages that could cause water backup
- Do NOT get on the roof or attempt any exterior repairs
Within the first 24 hours:
- Your roofing contractor arrives to assess and tarp the damaged area ($200–$500, typically covered by insurance)
- Continue documenting interior damage as it develops — some stains and damage expand over the next 12–24 hours as trapped water migrates
Within the first week:
- Insurance adjuster visits the property
- Professional roofer provides detailed damage assessment and repair estimate
- Begin drying out affected interior areas — run fans, open windows if weather permits, consider a dehumidifier for enclosed spaces
Critical mold prevention note: Mold can begin growing on wet drywall and insulation within 24–48 hours in Georgia’s humidity. If any drywall, carpet, or insulation has been thoroughly soaked, it needs to be dried or removed within this window. If you cannot dry the area quickly, a mold remediation company should assess the situation. Mold remediation costs $1,000–$5,000, but catching it early (within the first week) is far less expensive than discovering it months later.
When to Call a Professional
If your roof is leaking during a storm, call immediately — not to send someone onto the roof right now, but to secure your place on the emergency response list. The sooner you call, the sooner a crew arrives after conditions clear.
Our team brings over 40 years of combined roofing experience and provides emergency response across Blue Ridge, Cherokee County, and Chatsworth. We respond to emergency calls typically within 2–4 hours of safe conditions, provide professional tarping to protect your home, and handle the permanent repair and insurance documentation from start to finish.
Dealing with an active leak right now? Contact True Hand Roofing for emergency roof repair assistance, or call us at (706) 455-9009. You can also get an instant estimate to understand the full scope of your roof’s needs once the storm passes.
Related reading: Why You Shouldn’t Ignore a Minor Roof Leak | The Dangers of a DIY Roof Tarp | How to Find a Roof Leak: A Homeowner’s Guide