After a severe storm tears through your neighborhood, you look up and see the damage — missing shingles, exposed decking, maybe a hole from a fallen limb. Your home is open to the elements, and rain is in the forecast. Your instinct is to grab a blue tarp from the garage, prop a ladder against the house, and handle it yourself. It seems simple enough: get up there, spread the tarp, nail it down, and deal with the real repair later.
Stop. Attempting a DIY roof tarp is one of the most dangerous decisions a homeowner can make, and the risks go far beyond just falling off the roof. An improperly installed tarp can actually make your damage worse, complicate your insurance claim, and cost you thousands more than calling a professional in the first place.
Here is why the professionals at True Hand Roofing strongly urge every homeowner to stay off their roof after a storm — and what the right approach looks like.
The Fall Risk Is Deadly Serious
This is not a scare tactic. It is a statistical reality. According to the Consumer Product Safety Commission, ladder-related accidents cause over 500 deaths and 300,000 emergency room visits per year in the United States. A significant percentage of those involve homeowners climbing onto roofs.
Now consider the conditions you are facing after a storm:
A wet roof is exponentially more dangerous than a dry one. Wet asphalt shingles lose the majority of their traction. Studies by roofing safety organizations indicate that a wet roof surface multiplies fall risk by approximately 5 times compared to dry conditions. Add wet leaves, pine needles (ubiquitous in North Georgia), or algae, and the surface becomes essentially frictionless. Professional roofers describe wet, debris-covered shingles as “walking on ice.”
Storm-damaged decking may not hold your weight. A roof that has been hit by hail, wind, or a fallen limb may have weakened decking underneath shingles that look intact from the outside. You step on what appears to be a solid surface, the rotten or cracked plywood gives way, and you fall through the roof into your attic — or worse, all the way through the ceiling to the floor below.
You are carrying heavy, awkward materials at height. A properly sized tarp for a roof section can weigh 20–40 pounds, is difficult to control in even mild wind, and requires both hands to manage. This means at least one moment when you are standing on a wet, damaged roof without holding onto anything, wrestling a tarp that the wind is trying to rip out of your hands.
You likely lack the right equipment. Professional roofing crews use harnesses attached to ridge-mounted anchors, roof jacks that create stable footing, and extension ladders rated for the load. A homeowner climbing a garage-sale ladder in sneakers is facing an entirely different level of risk.
Your family needs you healthy. No amount of water damage is worth a fatal or life-altering fall.
An Improper Tarp Can Make the Damage Worse
Even if you manage to get on the roof safely, the way you install the tarp matters enormously. The most common DIY mistakes do not just fail to protect the roof — they create new damage that would not have existed otherwise.
Mistake 1: Nailing directly through shingles. This is the most common and most destructive DIY error. Homeowners drive nails through the tarp and directly into the shingle surface, punching dozens or even hundreds of new holes in the roofing material. When the tarp is eventually removed for permanent repair, every one of those nail holes is a leak waiting to happen. The “temporary fix” has now created damage across a much wider area than the original problem.
Professional tarping uses wood battens (2x4s) placed over the tarp and screwed into the roof decking at strategic points. The battens distribute the clamping force across a wide area, and the fasteners are placed only where they will be covered or repaired during the permanent fix. Zero additional holes in the intact shingle field.
Mistake 2: Creating a water trap. A tarp that is not properly graded and tensioned can pool water on its surface or, worse, channel water underneath itself. Instead of shedding rain away from the damaged area, an improperly laid tarp can actually concentrate water flow into the hole — like a funnel aimed at your living room. The result is water damage in areas that were completely fine before you got on the roof.
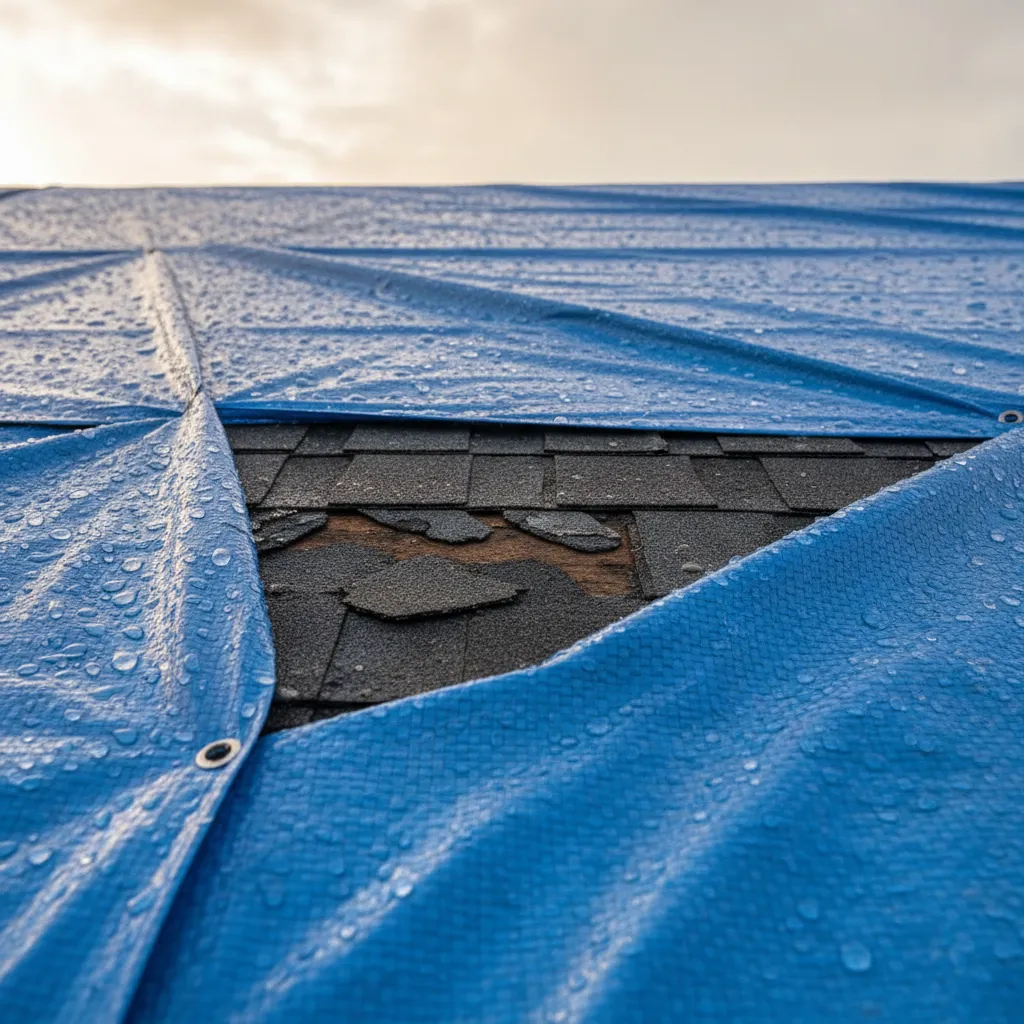
Mistake 3: Covering too little area. A tarp needs to extend well beyond the visible damage in all directions — typically 3–4 feet past the damaged area on all sides, and it must extend over the ridge if the damage is near the top of a slope. Homeowners often undersize the tarp, leaving exposed gaps where wind-driven rain enters.
The bottom line: an improperly installed tarp can cause $1,000–$5,000 in additional damage that would not have occurred if the roof had simply been left uncovered until professionals arrived. In some cases, that additional damage exceeds the cost of the original storm damage.
A Tarp on a Roof Is a Giant Sail
Even the most securely attached DIY tarp is vulnerable to wind. A 20x30-foot tarp on a roof is essentially a sail, and it does not take hurricane-force winds to cause problems. Gusts of 30–40 mph — common in the days following a storm front — can catch an edge, balloon the tarp upward, and tear it loose from inadequately secured fasteners.
When a tarp rips free, two things happen:
- Your roof is exposed again — back to square one, except now you also have nail holes from the first attempt
- The tarp becomes a projectile — a heavy, flapping tarp can damage siding, break windows, entangle with power lines, or strike a person on the ground
Professional installations account for wind by using overlapping tarp sections, heavy-duty reinforced grommets (not the cheap brass ones that tear out), and batten systems that grip the tarp along its entire edge rather than at isolated points.
It Could Complicate Your Insurance Claim
Your insurance company expects you to mitigate further damage — but they do not expect you to risk your life doing it. More importantly, they expect the mitigation to be done correctly.
Here is where DIY tarping can backfire on your claim:
- Additional damage you caused (nail holes, water channeling, broken shingles from foot traffic) may be excluded from your claim. Your adjuster can distinguish between storm damage and homeowner-inflicted damage.
- A professional tarping receipt from a licensed contractor is clean, credible documentation of a reasonable mitigation step. A DIY tarp with no receipt and visible installation errors raises questions about what damage was caused by the storm versus the homeowner.
- If you are injured during the DIY attempt, your insurance covers the building — not your medical bills from a fall off your own roof. That is a separate (and potentially uninsured) cost.
Using a professional, licensed contractor for emergency tarping gives your insurer a clear, credible invoice for a necessary service and ensures the temporary repair meets professional standards.
What Professional Emergency Tarping Actually Looks Like
Understanding the professional process helps illustrate why it is so different from the DIY approach:
- Safety assessment. The crew evaluates the structural stability of the damaged area before anyone steps on the roof. If the structure is compromised, they adjust their approach or call for structural support.
- Proper safety equipment. Harnesses, ridge anchors, roof jacks, and non-slip footwear rated for wet conditions. Every crew member is tied off before stepping on the roof.
- Debris clearing. Broken branches, loose shingles, and other storm debris are cleared from the work area to create a safe, stable surface.
- Tarp sizing and placement. A heavy-duty, UV-resistant reinforced tarp (not a $15 hardware store tarp) is sized to extend 3–4 feet past the damage in all directions and over the ridge when needed.
- Batten system installation. Wood battens (typically 1x3 or 2x4 lumber) are laid over the tarp edges and screwed into the decking, creating a secure, wind-resistant seal that does not damage intact shingles.
- Water flow verification. The crew confirms that the tarp sheds water downslope and away from the damaged area, with no pooling or channeling underneath.
The entire process takes 2–4 hours and costs $200–$500 — almost always covered by your insurance claim. Compare that to a DIY attempt that risks your life, can cause $1,000–$5,000 in additional damage, and may complicate your insurance settlement.
When to Call a Professional
The answer is straightforward: every time. If your roof is damaged — by a storm, a fallen tree, flying debris, or any other event — your job is to stay safe on the ground, document the damage from below, and call for professional help.
Here is what to do while you wait for the crew to arrive:
- Place buckets under any active interior leaks
- Move furniture and valuables away from the affected area
- If a ceiling is bulging with pooled water, carefully puncture the lowest point with a screwdriver to release it into a bucket
- Continue photographing and documenting the damage
- Call your insurance company to start the claim
Our team brings over 40 years of combined roofing experience serving homeowners across Canton, Jasper, and Dawsonville. We provide emergency response typically within 2–4 hours, professional tarping that protects your home and your insurance claim, and permanent repairs backed by a written warranty.
Your safety is priceless. If your roof is damaged, stay on the ground. Contact True Hand Roofing for fast, safe, professional emergency roof repair, or call us at (706) 455-9009. You can also get an instant estimate to understand the scope of your roof’s needs.
Related reading: My Roof Is Leaking in a Storm: What to Do | What to Do After a Tree Falls on Your Roof | 5 Mistakes When Filing a Roof Insurance Claim