A modern TPO (Thermoplastic Polyolefin) roofing system is one of the highest-performing options available for commercial and industrial buildings across Cherokee County, Dawsonville, and Ellijay. But even the best roofing material is only as good as its installation. A professionally installed TPO system can protect your building for 20-30 years, while a poorly installed one can fail within the first decade.
Understanding the installation process helps you evaluate contractors, ask informed questions, and know exactly what to expect when your project begins. Our team brings over 40 years of combined experience installing commercial roofing systems, and here’s a detailed walkthrough of how a professional TPO installation unfolds from start to finish.
Step 1: Pre-Installation Inspection and Tear-Off
Every quality TPO installation begins well before the first roll of membrane reaches your rooftop. The process starts with a thorough inspection of your existing roof to assess its condition and determine the scope of work.
Structural Assessment. The roofing crew inspects the existing roof deck — typically steel, concrete, or wood — for signs of rot, corrosion, or structural compromise. Any damaged decking must be repaired or replaced before the new system goes on. This is a critical step that some less experienced contractors skip, and it’s one of the main reasons roofs fail prematurely.
Tear-Off. In most cases, the old roofing material is completely removed down to the structural deck. This full tear-off typically costs $1-$2 per square foot in labor and disposal but provides several important benefits:
- Reveals hidden damage to the deck, insulation, or vapor barrier
- Ensures the new system starts on a clean, solid substrate
- Avoids exceeding Georgia’s building code limits on roof layers (typically two maximum)
- Eliminates trapped moisture that could compromise the new insulation
For buildings where the existing roof is still structurally sound and dry, a “recover” approach may be possible. A recover board is installed over the existing roof, and the new TPO system goes on top. This saves $1-$2 per square foot and reduces installation time by roughly a day, but it’s only viable when conditions are right.
Step 2: Insulation and Substrate Preparation
With the deck exposed and repaired, the next step is installing the thermal insulation layer. This is where a significant portion of your roofing investment goes — and where a large share of your long-term energy savings comes from.
Rigid Polyisocyanurate (ISO) Insulation. The standard insulation material for commercial TPO systems is rigid ISO board. It’s installed in one or two layers directly over the roof deck, with staggered joints to prevent thermal bridging. The thickness depends on your building’s energy requirements and Georgia’s commercial building energy code, which requires a minimum R-value that varies by climate zone.
| Insulation Thickness | Approximate R-Value | Typical Application |
|---|---|---|
| 2 inches | R-12.4 | Minimum code compliance (some zones) |
| 3 inches | R-18.6 | Standard commercial buildings |
| 4 inches | R-24.8 | Enhanced energy performance |
| 5-6 inches | R-31 to R-37 | Maximum efficiency, utility rebate eligible |
Cover Board. In many installations, a thin cover board (typically 1/4-inch or 1/2-inch high-density polyiso or gypsum) is installed over the main insulation layer. This provides a smooth, stable surface for the TPO membrane, adds puncture resistance, and acts as a thermal barrier. Cover boards cost an additional $0.30-$0.75 per square foot but are strongly recommended for long-term performance.
The insulation is mechanically fastened to the structural deck using specialized fasteners and plates. The fastener pattern is engineered based on the building’s wind zone, height, and location — Georgia’s commercial building code specifies minimum wind uplift resistance requirements that vary by region.
Step 3: Membrane Attachment — Mechanical vs. Adhered
With the substrate fully prepared, the large rolls of white TPO membrane are brought to the roof. Each roll is typically 10 or 12 feet wide and up to 100 feet long. The rolls are positioned to minimize the number of seams while accounting for penetrations and roof geometry.
There are two primary methods for securing the membrane to the substrate:
Mechanically Attached (Most Common, $5-$7/sqft total). This is the most widely used method for commercial TPO installations. The membrane is rolled out, and specialized plates and long fasteners are driven through the membrane, insulation, and into the structural deck along the edge of each sheet. The next sheet overlaps the fastener row, and the seam is welded shut, completely encapsulating the fasteners. This method is cost-effective, fast, and provides excellent wind uplift resistance.
Fully Adhered ($6-$8/sqft total). In this method, a bonding adhesive is applied to the substrate surface, and the TPO membrane is carefully rolled into it to create full contact. This produces a smooth, sleek roof surface with no fastener indentations. Fully adhered systems are preferred for roofs with complex shapes, areas with extreme wind exposure, or buildings where aesthetics matter (visible from upper floors of adjacent buildings). The adhesive requires dry conditions and temperatures above 40 degrees Fahrenheit for proper curing.
Your contractor should recommend the attachment method based on your building’s structural capacity, wind zone, roof geometry, and budget. In many cases, a hybrid approach is used — mechanically attached in the field of the roof with fully adhered details at penetrations and edges.
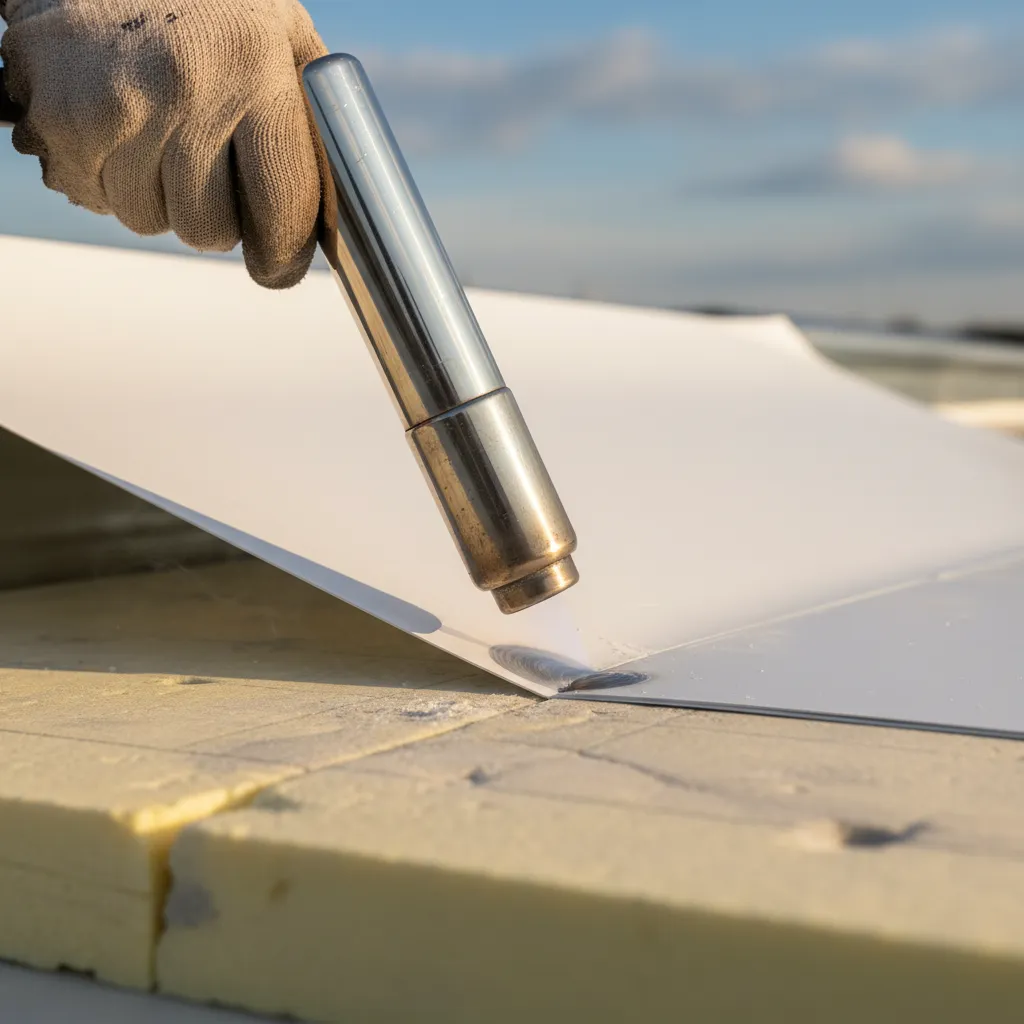
Step 4: Hot-Air Welding the Seams
This is the most critical and technologically advanced step in the entire installation process. The seams — where one roll of TPO overlaps the next by approximately 6 inches — are fused together using robotic hot-air welding machines.
How It Works. The robotic welder travels along the seam overlap, heating both the top and bottom membrane surfaces to approximately 1,100 degrees Fahrenheit. Immediately behind the heating element, a heavy pressure roller fuses the two layers together. The extreme heat causes the thermoplastic material to flow and bond at a molecular level, creating a permanent, monolithic weld that is actually stronger than the surrounding membrane.
Why It Matters. This heat-welded seam is what separates TPO from older single-ply systems that relied on adhesive or tape seams. A properly welded TPO seam will not separate, peel, or degrade over time. It creates a truly continuous waterproof barrier across the entire roof surface. Independent testing consistently shows that TPO seams fail at higher force levels than the membrane itself — meaning the seam is the strongest part of the roof.
Quality Control. Experienced crews continuously monitor weld quality during installation. The seam should have a consistent width of fused material (typically 1.5 inches minimum) with no channels, fish mouths, or burn-through. Many manufacturers require seam probing — physically testing every linear foot of welded seam with a blunt probe tool — as a condition of their warranty.
Step 5: Detail Work and Flashing
A roof is only as waterproof as its weakest point, and the weakest points are always the penetrations and transitions. This is where the skill and experience of the installation crew matters most.
Using hand-held hot-air welders, technicians meticulously flash and seal every penetration and edge detail on the roof. Common details include:
- Pipe boots and vents: Custom-fabricated TPO pipe boots are welded around every roof penetration
- HVAC curbs: Full-wrap flashing around air handling units, ensuring watertight transitions at all corners
- Drains and scuppers: Interior drains receive clamping rings with TPO flanges welded into the field membrane
- Parapet walls and coping: TPO membrane is carried up the wall face and terminated with counter-flashing or coping metal
- Skylights and hatches: Raised curb details with welded membrane and counter-flashing
Each of these details requires multiple cuts, welds, and overlapping layers to create redundant waterproofing. On a typical commercial building, detail and flashing work accounts for 25-35% of the total installation labor — a significant portion that reflects how important these areas are to long-term performance.
Step 6: Final Inspection and Warranty
Once the installation is complete, a thorough quality assurance inspection is performed. A senior project manager walks the entire roof, physically probing every inch of every seam and visually inspecting all flashing details.
This internal inspection checks for:
- Consistent seam weld width and integrity across the entire roof
- Proper membrane termination at all edges and penetrations
- Correct fastener patterns and density per the engineering specifications
- Adequate membrane overlap at all seams (minimum 6 inches)
- Clean, professional appearance with no wrinkles, bridging, or fish mouths
Following the internal inspection, the manufacturer’s representative conducts an independent inspection. This third-party verification is required before the manufacturer will issue their warranty — typically a 20-30 year no-dollar-limit (NDL) warranty for qualifying installations. The manufacturer’s warranty covers both materials and workmanship when the installation is performed by a certified contractor.
What the Timeline Looks Like
For a typical 10,000-square-foot commercial building, expect the following approximate timeline:
| Phase | Duration |
|---|---|
| Tear-off and deck inspection | 1 day |
| Insulation installation | 1 day |
| Membrane attachment and welding | 1-2 days |
| Detail work and flashing | 1 day |
| Inspection and punch list | Half day |
| Total | 3-5 business days |
Weather is the biggest variable. TPO installation requires dry conditions, and seam welding performs best when ambient temperatures are above 40 degrees Fahrenheit. Rain delays can extend the timeline, but a professional crew will have temporary weatherproofing in place each evening to protect your building overnight.
When to Call a Professional
If you’re considering a TPO cool roof or comparing TPO membrane options for your commercial building, the first step is a professional roof assessment. Our team will inspect your existing roof, evaluate your building’s structural capacity and insulation needs, and provide a detailed written estimate that breaks down every component of the installation.
We provide transparent pricing with no hidden fees, explain the recommended attachment method for your specific building, and walk you through the warranty options available. Every installation follows manufacturer specifications and undergoes both internal and third-party inspection.
Contact True Hand Roofing to schedule your free commercial roof assessment, or get an instant estimate to start planning your TPO installation.
Related Articles
Learn more about TPO roofing systems: