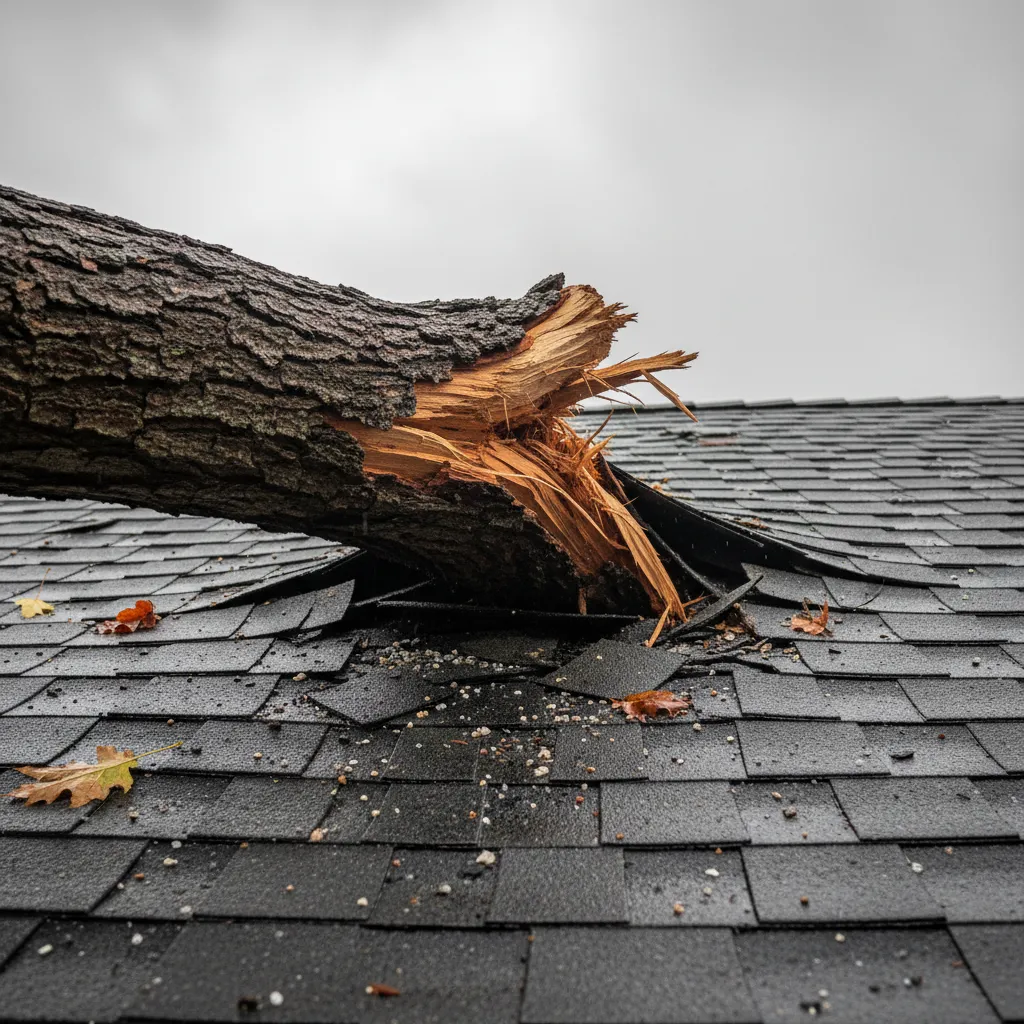
It is a homeowner’s worst nightmare. A powerful storm rolls through, you hear a deafening crash, and the house shakes. A tree has fallen on your roof. In this shocking and stressful moment, it is easy to panic — but the steps you take in the next few hours are critical for your family’s safety, for protecting your home from further damage, and for ensuring your insurance claim goes smoothly.
In the heavily wooded communities across Ellijay, Blue Ridge, and Blairsville, tree strikes are one of the most common causes of catastrophic roof damage. Our team has responded to hundreds of these emergencies over the years, and we have seen firsthand how much the homeowner’s initial response matters. Here is your step-by-step guide.
Step 1: Prioritize Safety Above Everything
Before you even think about the damage, your first and only priority is the safety of everyone in the home.
Evacuate immediately. Get everyone — family, pets — out of the house as quickly and safely as possible. Do not stop to gather belongings. A tree that has breached your roof may have compromised load-bearing walls, ceiling joists, or the roof structure itself. What looks stable could collapse without warning.
Call 911 if any of the following apply:
- Power lines are down or tangled in the tree (stay at least 35 feet away from downed lines — they can energize the ground around them)
- You smell gas (a falling tree can rupture gas lines)
- Anyone is injured or trapped
- The structural integrity of the home is visibly compromised (sagging walls, shifted door frames, cracked foundation)
Do not re-enter the home until emergency services or a qualified structural professional has declared it safe. Even if the damage appears limited to one room, the weight of the tree (which can be 2,000–10,000+ pounds for a mature hardwood) may be stressing the structure in ways that are not visible.
Turn off utilities if you can do so safely. If you can reach your electrical panel or gas shutoff without entering a damaged area of the home, turn them off. This prevents electrical fires and gas leaks while the situation is assessed.
Step 2: Document Everything Before Anyone Touches the Scene
Once your family is safe, shift into documentation mode. Your insurance claim depends on clear, comprehensive evidence of the damage in its original state — before any cleanup, tree removal, or temporary repairs alter the scene.
Take these photos and videos:
- Wide shots showing the tree on the house from multiple angles (front, sides, back if accessible)
- Close-up shots of where the tree meets the roof, showing the impact area, broken branches, and any visible structural damage
- Interior photos of any damage inside — water stains, debris, damaged ceilings, shifted walls
- The tree itself — its base, the stump or root ball, and its condition (this matters if the tree came from a neighbor’s property)
- Surrounding property damage — damaged fences, vehicles, siding, gutters, landscaping
- Video walkaround — a 2–3 minute video documenting the entire scene provides context that photos cannot
Date-stamp everything. Most smartphone cameras embed date and time metadata automatically, but check your settings. Your insurer will use timestamps to establish the timeline.
Step 3: Notify Your Insurance Company
With your documentation in hand, call your homeowner’s insurance company as soon as possible — ideally within 24 hours of the incident. Here is what to expect and what to ask:
What your insurer will do:
- Assign a claim number
- Schedule an adjuster visit (typically 3–7 business days, though after major storms it can take longer)
- Provide guidance on their specific process for tree damage claims
What to ask your insurer:
- “What is my deductible for this claim?” (typically $1,000–$2,500 for homeowner’s policies in Georgia)
- “Does my policy cover emergency tarping and temporary repairs?”
- “What is my tree removal coverage limit?” (most policies cap at $500–$1,000 per tree for removal)
- “Am I covered for temporary housing if the home is uninhabitable?” (most policies include “loss of use” coverage)
Important: Your policy requires you to take “reasonable steps” to mitigate further damage. This means getting the roof covered. If you fail to protect the home from additional water damage after the initial event, your insurer can deny coverage for the secondary damage.
Step 4: Call a Professional for Emergency Roof Tarping
The hole in your roof is a gaping wound. Every hour it remains exposed, rain, wind, and debris pour in — causing water damage to ceilings, walls, insulation, electrical systems, and belongings. Emergency tarping is the single most important step you can take to prevent a $10,000 problem from becoming a $30,000 problem.
This is not a DIY job. A storm-damaged roof with a tree on it is one of the most dangerous environments in residential construction. The structure may be weakened, the surface is wet and covered in debris, and the tree itself may shift. Professional emergency crews have the training, harnesses, and equipment to work safely in these conditions.
What professional emergency tarping involves:
- Assessing the structural stability of the damaged area
- Clearing debris to access the damage zone safely
- Covering the exposed area with a heavy-duty, UV-resistant reinforced tarp (not a hardware-store blue tarp)
- Securing the tarp with wood battens screwed into solid decking — never nailed through shingles
- Ensuring the tarp sheds water properly and will withstand wind without tearing loose
Professional emergency tarping typically costs $200–$500 depending on the size of the damaged area, and this cost is almost always covered by your insurance under the “duty to mitigate” provision. Most reputable roofing companies can arrive within 2–4 hours after a call, weather permitting.
Step 5: Coordinate Tree Removal
Tree removal and roof repair are two separate operations that need to be carefully coordinated. Improper tree removal can cause additional damage to the already compromised roof structure — a heavy limb dropping onto weakened decking can collapse an entire section.
How to handle tree removal:
- Get multiple quotes. Tree removal from a roof typically costs $500–$2,500, depending on size, species, and accessibility. Emergency rates (during/immediately after the storm) run 25–50% higher.
- Use an insured, licensed arborist. Verify insurance before anyone climbs on your property. If an uninsured tree worker is injured on your property, you could be liable.
- Coordinate with your roofer. Ideally, your roofing contractor and tree service work together. The roofer can assess what needs to happen to the roof before, during, and after the tree is removed, preventing additional damage during the extraction.
Insurance and tree removal costs: Your homeowner’s policy typically covers $500–$1,000 per tree for removal — but only when the tree has damaged a covered structure (your home, garage, fence). A tree that falls in your yard without hitting a structure is generally not covered for removal. If the tree is very large and removal exceeds your policy limit, the remaining cost is out-of-pocket.
Step 6: Plan the Permanent Repair
Once the tree is removed and the roof is tarped, you have time to plan the permanent repair without the pressure of an active emergency. Here is what this phase looks like:
Damage assessment timeline:
| Step | Timeline | Description |
|---|---|---|
| Emergency tarp installed | Day 1 | Roof secured, interior protected |
| Insurance adjuster visit | Days 3–7 | On-site damage assessment |
| Professional roof inspection | Days 1–5 | Detailed report for your records and claim |
| Tree removal complete | Days 2–14 | Depends on crew availability and tree size |
| Repair/replacement estimate | Days 7–14 | Contractor provides detailed scope and pricing |
| Permanent repair begins | Days 14–30 | After insurance approval and scheduling |
What the permanent repair may involve:
- Minor tree strike (limbs under 6 inches): May only need shingle replacement and minor decking repair. Cost: $500–$2,000.
- Moderate tree strike (trunk or major limb): Likely requires structural repair to rafters and decking, plus full shingle replacement on the affected section. Cost: $3,000–$8,000.
- Major tree strike (large trunk through the roof): May require partial or full roof replacement, structural engineering assessment, and extensive interior restoration. Cost: $10,000–$25,000+.
Your insurance should cover the full repair cost (minus your deductible) as long as the damage is properly documented and the claim is filed correctly.
Preventive Steps for North Georgia Homeowners
Living among the beautiful hardwoods and pines of North Georgia comes with inherent tree risk. Here is what you can do to reduce the chance of a tree strike:
- Have a certified arborist inspect mature trees within falling distance of your home every 3–5 years. Look for dead limbs, hollow trunks, root rot, and leaning.
- Remove dead or dying trees proactively. A planned removal costs $300–$1,500 — far less than the $5,000–$25,000+ cost of a tree strike.
- Trim branches that overhang your roof. Keep a minimum clearance of 10 feet between branches and your roof surface.
- After severe storms, walk your property and inspect trees for new damage — cracked trunks, leaning, exposed roots, or hanging limbs (called “widow-makers”).
When to Call a Professional
If a tree has fallen on your roof — or if you hear cracking and suspect a tree may be leaning toward your home — call immediately. Time is critical. Every hour of exposure worsens interior damage and increases repair costs.
Our team brings over 40 years of combined roofing experience and has handled hundreds of emergency tree strikes across Ellijay, Blue Ridge, and Blairsville. We provide emergency tarping, coordinate with tree services, work directly with your insurance adjuster, and handle the permanent repair from start to finish.
Has your roof been hit by a tree? Contact True Hand Roofing for emergency roof repair, or call us at (706) 455-9009 for immediate assistance. You can also get an instant estimate to understand the scope of your roof’s needs.
Related reading: The Dangers of a DIY Roof Tarp | 5 Mistakes When Filing a Roof Insurance Claim | My Roof is Leaking in a Storm: What to Do